Resume Sorting on HR Process
Tuesday, August 27, 2019
Thursday, August 22, 2019
Monday, August 19, 2019
UiPath
Automation For Email
Download attachment based on email subject
Step 1:
Use get Outlook mail messages activity and
mention folder in the properties from folder you want to get mails
like(“inbox”) and check/uncheck the unread an mark read according to your
requirement .and store it in a variable getmailmessages .
Note: Make sure you are logged in your outlook mail or else you need to provide the
credentials
Step 2:
Use for each activity to look through every
mail in inbox folder and use variable getmailmessages
in
for each activity
Note: Change the type of argument of for each activity to system.mailmessages.
Step 3:
In the body of for each activity use If condition to add condition to get attachment of particular mail only with respected subject name .
Use item as variable in save attachment
activity and save and Run
Running Process: The Robot enters the Inbox folder and scans
each and every mail message and if any mail contains subject name with what you
have provided in if condition then it downloads the attachment of that
particular mail and save it in a folder.
Thank You,Friday, August 16, 2019
How To Install UiPath Studio
How To Install UiPath.
Step 1) Enter
this URL in your browser: https://www.uipath.com/community. Click
on get community edition button.
Step 2) Enter
all the marked details
Step 3) Click
Request Community Edition
Step 4) You
will receive a mail below. Click on download community edition your
download will begin.
Step 5) Once
the download is completed click on the setup file
Step 6) Once the software is installed click on start free trial
Step 7) In
next screen,
1.
Enter Email address and click on activate button.
2.
Device id will be detected automatically.
3.
Then Click on Activate button.
You will have UiPath on
your system now!!!
Wednesday, August 7, 2019
UiPath Sample Project
Sample
Script using UiPath
Simple calculator Calculation
Following are steps to
create a Simple calculator calculation automation.
Step 1) Click
on the "Blank" icon, boxed in the below image:
Step 2) In
the next screen,
1.
Enter the name of the project
2.
Click Create Button
Step 3) In next screen,
1.
Click on Recording
2.
Select "Basic."
Step 4) This
opens a small window having an icon to record as below. Click on the Record
button
Step 5) Once
this icon is clicked, you will see the cursor turning into hand icon and the
entire screen turning into blue and highlighting all icons around it as shown
below.
Step 6) Perform
the manual tasks that you want to automate. UiPath will automatically create
the sequence of your mouse/keyboard actions.
Once recording is done,
click Save and Exit
Step 7) You
will see sequence of recorded steps as below
Step 8)Then
click on the run icon. UiPath would repeat back the recorded actions.
This is a basic way to
create small automation robots. UiPath has lots of advance features to create
more complex robots.
All About UiPath Tool
All About UiPath
How To get Started
UiPath has GUI which
consist of multiple panels. It offers easier access to specific
functionalities.
Following are the main
components of UiPath Studio:
- The
Ribbon
- The
Universal Search Bar
- The
Activities Panel
- The
Library Panel
- The
Project Panel
The Ribbon:
It consists of the
following four tabs:
1. Start –
It helps in to create any new project or to open a previously created task. By
default, all the projects are created in C:\Users\Username\Documents\UiPath.
2. Design –
It offers all the options to create or launch any sequences, flowcharts or,
access wizards and, manage variables.
3. Execute –It
will help in running or stop any projects. Before starting the debug process,
it will slow down steps and open logs.
4. Setup –
To publish a project or create a shortcut for it, schedule tasks, and install
extensions
The Universal Search Bar:
The Universal Search bar
allows the user to search for anything contained in the libraries, activities,
project and the Designer panels.
The Activities
Panel: The Activities panel allows quick access to all available
activities that can be dragged to the current project.
The Library Panel: The
Library panel allows you to reuse automation. A search box is also given to find
items faster.
The Project Panel: The
Project panel allows to view the contents of the current project and open the
file location in a Windows Explorer.
Tuesday, August 6, 2019
Monday, August 5, 2019
UiPath Use case for Resumes Sorting In HR Process
UiPath Automation For HR process
Resumes Sorting
Description: I a Hr Process there are more than 500 resumes and Hr need s to screen each and every resume and sort based of job profile and Technology for conducting Interview based on requirement so it takes Lot of Time for Hr to screen each and every resume so with the help of RPA this can be automated where Robot scan each and every resume whether it is PDF or Word file and move the particular to respected folder name of technology so it becomes easy for Hr to directly to particular folder and view the resume instead of screening all resumes.
Prerequisites: 1. Create a root folder where you save all your Resumes(PDF+Word).
2. Create sub folder where you want to save all sorted resume based on technology name .
Lets Start;
Step 1 :
Take a assign activity and create a variable for root folder (RootFolder)
Step 2:
Take a assign activity and create a variable for resumes folder (ResumesFolder)
Step 3 :
Take a assign activity to store the location of Pdf folder (pdfResume_Folder)
Step 4 :
Take a assign activity to store the location of Pdf folder (docResume_Folder)
Step 5 :
Take a assign activity to get files from pdf folder (filedpdf)
Step 6 :
Take a assign activity to get files from Docfolder (fileddoc)
Step 7 :
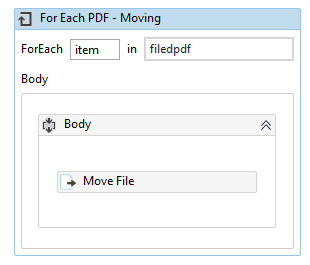
Take For each activity t move each pdf file to move to pdf folder (For each fildepdf)
Step 8 :
Move file activity to move files to pdf folder
Step 9 :
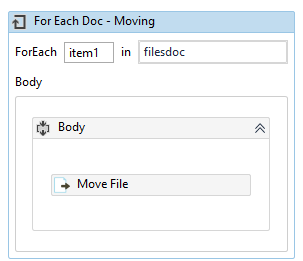
Take For each activity t move each doc file to move to doc folder (For each fildedoc)
Step 10 :
Move file activity to move doc files to doc folder
Step 11 :
Step 12 :
Take For each activity to sort pdf files to sort and move files (for each pdf_List)
Step 14 :
Read pdf with ocr for item and store it in avariable (valuepdf)
Step 16 :
Use Flow decision to use condition to sort
Step 17 :
Condition for flow to sort based on technology name for pdf
Note : add this condition for every flow decision and insert the technology name in it based on your requirement.
Step 18 :
Move file to specified folder based on technology name folder which we have created earlier
Step 19 :
Use same For each for Doc files also to sort and move files to specified folder (doc_List)
Step 20 :
read doc files wit read text activity and store it in a variable (valuedoc)
Step : 21
Use flow decision to sort the doc files
Step 22 :
Condition for flow decision sorting.
Note :
Take the n number of flow decision based on your requirement and conditions to sort.
This ends the workflow design save it and Run.
Thank You,
Subscribe to:
Comments (Atom)


